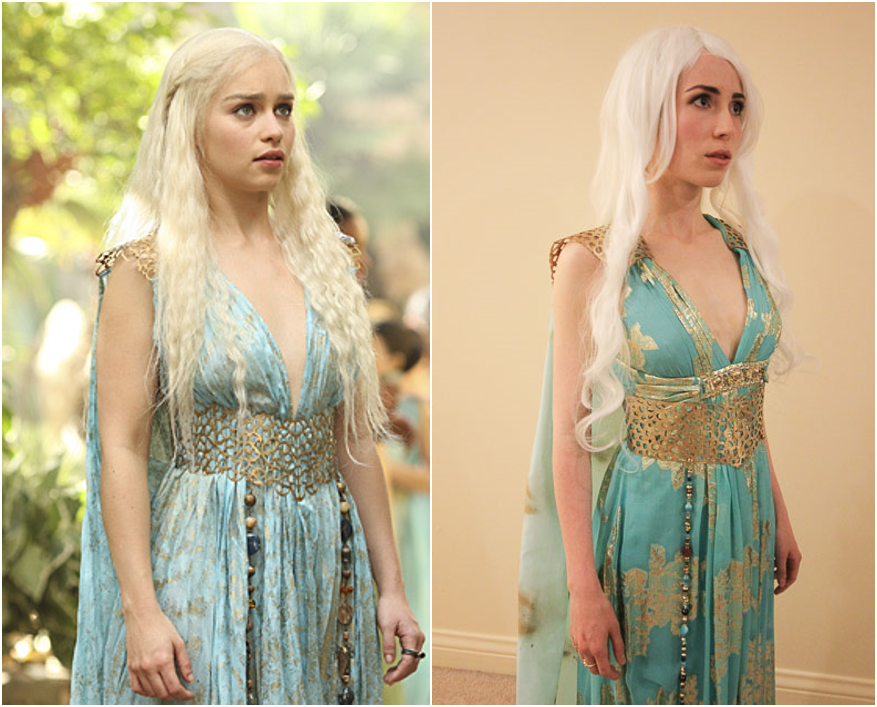
 |
| (I'm the one on the right.) |
Costume Creation Strategy
The bead strands and the cape were fairly straightforward. There's only so many ways to put beads on a strand (I used 3 packs of dollar-store beads and a few feet of gold wire). For the cape, I bought the cheapest fabric that matched the dress in hue and weight (or, as close as I could go!). The goal was to use fabric paint to splotch on the gold texture, but the fabric paint I bought was quite sheer. To match the bold gold of my preexisting dress, I instead used a cardboard stencil held several inches from the cloth and spray-painted a loose pattern.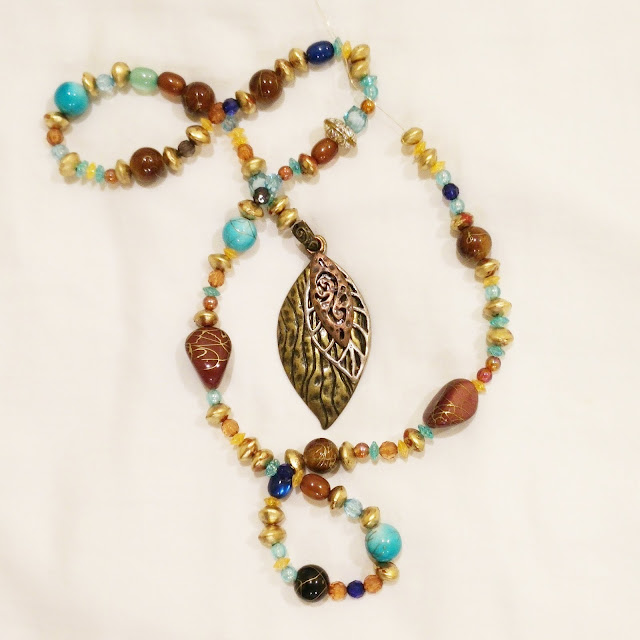
The golden accessories required a little more creativity. I contemplated cutting out lots of tiny holes from foam, but that seemed more tedious and dangerous than I was looking for, and potentially too stiff or sensitive to tears. In the end, I took a little inspiration from this cosplayer who used a similar technique to create a set of armor, but I changed enough that I think it is worthy of its own post.
Briefly, hot glue is squirted onto a non-adhesive surface in whatever pattern you want. After it dries, it can be easily peeled off the surface and painted. The end product is flexible, lightweight and surprisingly strong!
The whole thing came together much faster than I expected! The belt and shoulder accessories took about an hour to an hour and a half, not counting the waiting time for the glue and paint to dry. The beading was mindless, but time consuming at about two hours. Painting the cape took around thirty minutes, and gluing it to the shoulder pieces took about twenty minutes. Attaching the shoulder pieces to the dress was slower than it could have been; I wanted it to be detachable in a way to not destroy the front of the dress in case my sister wanted it back un-nerdified.
Materials and Tools: Belt and Pauldrons
- Cloth measuring tape (or ruler + string)
- Parchment paper (roughly enough to wrap around your waist)
- Hot glue gun
- Hot glue sticks (See Note 1!)
- Gold spray paint
- Gold wire
- Needle and thread (See Note 2!)
- Pen, scissors, papers to put down to avoid making a mess.
Notes:
- I used two glue sticks per shoulder pauldron, plus one glue stick for every three inches of the belt. The denser you make the mesh, the more glue you will use and the sturdier the final design will be. The looser the network, the less glue you will need and the more delicate the final product will be.
- Sewing is optional. I chose to sew the shoulder pieces onto my dress to avoid permanent transformation to my dress - See Instructions: Part 3, below.

Instructions: Belt and Pauldrons
Part 1: Cut Once Measure Twice
- Test your parchment paper: Tear off a small piece of parchment paper. Heat up your glue gun, and squirt out a few squiggles. Wait for it to cool and dry completely, then peel back the paper. The glue should pop off easily. If it doesn't, try a different brand (I used Reynold's brand). You could also buy a clear or translucent glue gun pad from craft stores for $5-7, although the limiting size of these mats means you will have to do the belt in multiple parts.
- Measure your waist at the part of your waist you want the belt to sit. Similarly, measure the length you want the shoulder caps to cover.
- Tear off a length of parchment paper a few inches longer than your waist measurement, to give yourself some wiggle room.
- Fold the paper in half - for symmetry! Don't crease it too much, sharp creases will show up in the final pattern.
- Trace the desired outline of your shape. Mine is sort of a curvy V shape, to get the point you see in the show version. I ended up making it 4.5 inches wide, but I probably should have gone to 5-5.5 inches instead.
- Cut out the shape, and test it out to see if you like the way it fits you. Ideally, there should be about a quarter-inch gap at the back. Fine-tune it as necessary.
- Repeat steps 3-6 to make the shoulder pieces. I made mine about 8 inches long and 4.5 inches wide. I started by making each piece symmetrical, and then cut out an arch-shape on the outer side of the front-facing part of the pauldron so that it would follow the angle of my ribs and come to a point around the crest of my shoulders.
Part 2: Let The Gluing Begin!
- Set-Up Your Work Station: Lay out your belt or shoulder piece templates on a pieces of scrap paper so that you don't mess up your work station. Put something on the television to keep your mind occupied (I watched Desoladies). Set aside a healthy stock of glue sticks, and heat up your glue gun.
- Squirt out some glue in a loop shape. The faster you move, the thinner the strips will be - but be careful to not go too fast or the glue may not fall in a smooth line. The slower you move, the thicker the lines will be - but keep in mind the glue will spread out a little as it solidifies.
- Keep moving your gun to create neighboring loops. I liked the look of the irregular network I created, but you should be able to create precisely spaced loops as well if that's your style. (I actually had to do some work to make purposefully irregular loops!)
- Don't worry too much about all the stringy glue hairs - they are easy enough to remove. It is a little time consuming to remove them, so try to keep your gun close to the paper for as long as possible. By not lifting your gun up too much, you prevent stringy hairiness formation.
- Work from one end to the next crossing the width in a zigzag pattern. This technique allows you to avoid joining fresh glue to already-solidified loops, which creates a disjointed texture. On the other hand, if you join new loops to still-liquidy loops, the connecting parts are seamless. You can see the difference in the first photo in Part 3!
- Let it dry for 10-15 minutes, then peel the paper off the glue!
 |
| Close-up of glue pattern. Please ignore the ugliness of my glue gun >_< |
Part 3: Painting and Assembly.
- Spray paint each side of the belt and shoulder pads, according to the directions on your paint. It only took me one coat per side.
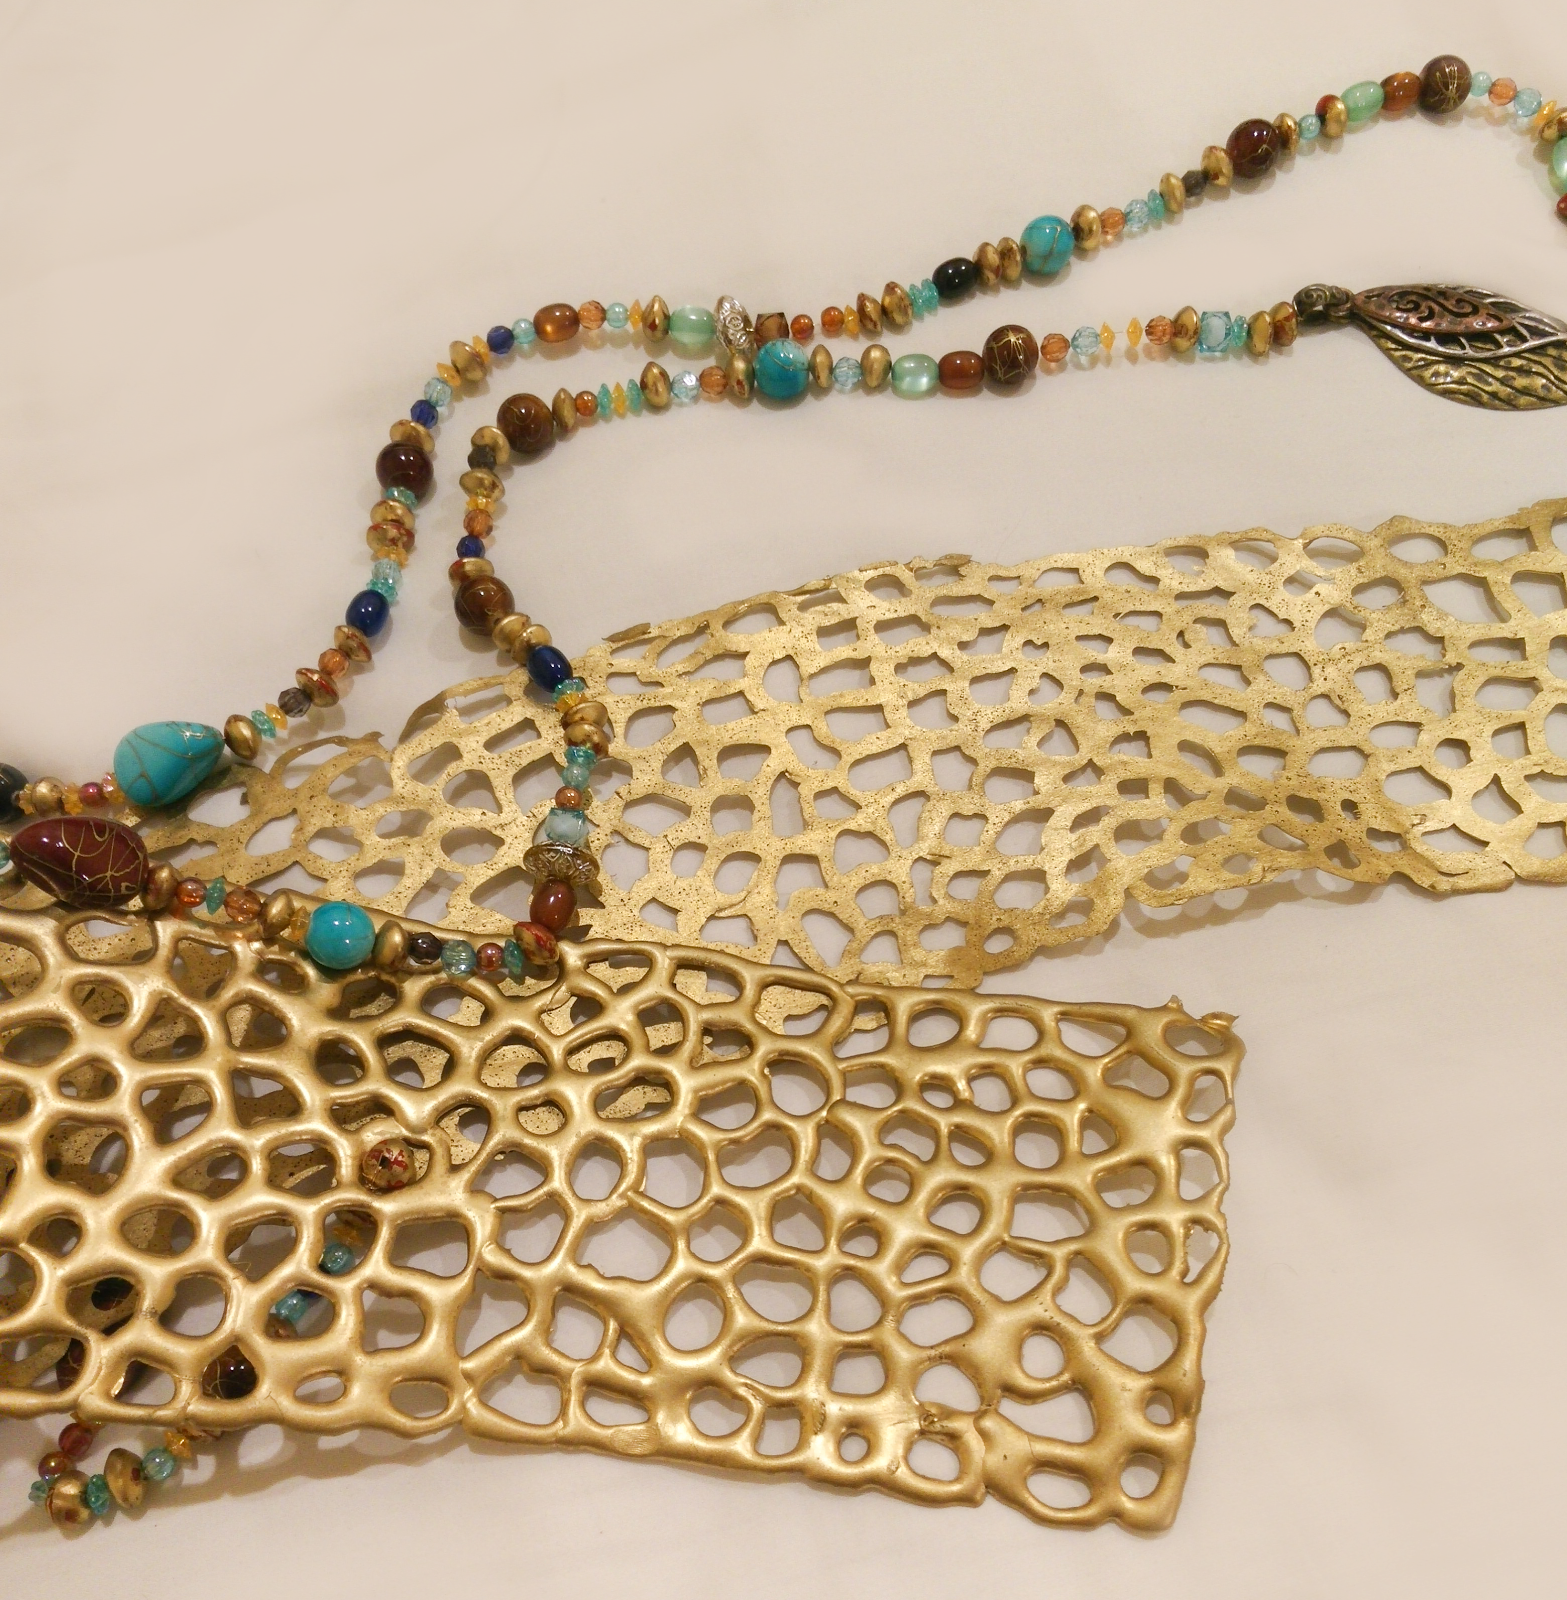
- The paper-facing side and the top side have different textures! Check out the photo below - the paper-facing side is flat and has a porous texture while the top is round, smooth and shinier. I actually preferred the flat and dimpled side - I thought it looked more like intricate metalwork! Choose whichever you think will work best.
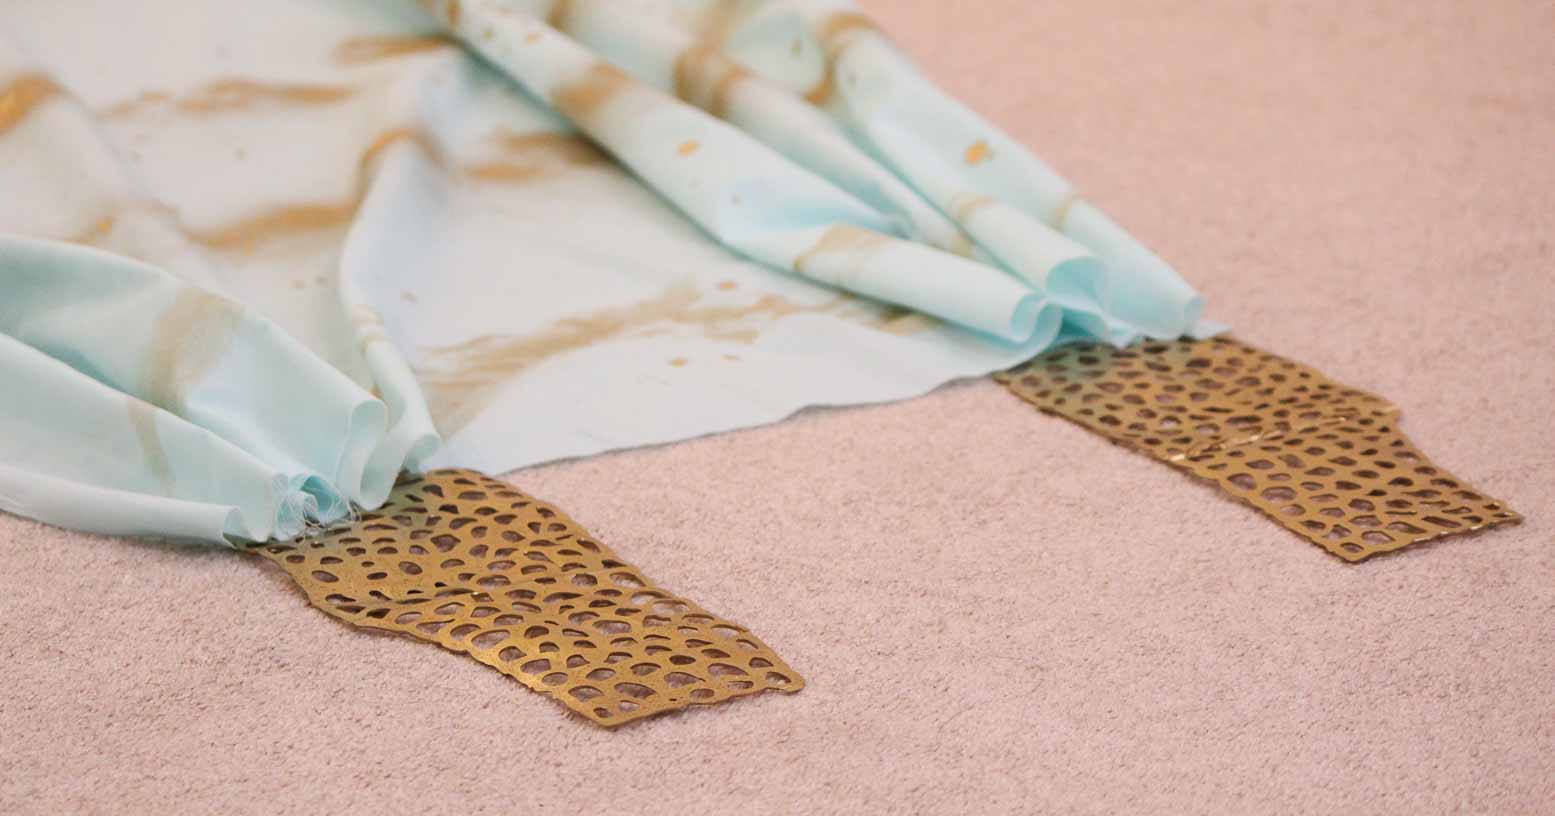
- Glue-only approach to attaching the shoulder pieces to the cape: Lay your cape on the ground. Starting from one end, fold or pleat the fabric into evenly-space 1-inch folds until you are about 4 inches from the center. Repeat on the other side. Check to make sure the cape is the appropriate width (I did this by lying down on top of my cap and comparing shoulder width, but I suppose you could use a ruler!) When you are happy with the way the cape is gathered, place dollops of glue between each fold of fabric. Let this dry for a few minutes so you don't disturb the pattern, then drop a health line of glue along the underside of the back part of a shoulder piece, and press it firmly along the top of the pleated fabric. Repeat for the other side.
- Non-destructive method to attach the shoulder pieces to the dress: I attached the front side of the shoulder pieces in a non-destructive manner so that I could remove them and return the dress to my sister. To do this, I ran a double-fold piece of gold wire behind the dress at the level I wanted the shoulder pieces to lie. I then sewed this wire to the inside liner layer of the dress, which left the outside completely unharmed. The thread can later be removed from the liner. I then wound the wire around the loops of the shoulder pieces. I was worried this would apply too much tension to just a small part of the glue mesh, but it held up fine all night!
- "Buckling" the belt: I used about six 2-inch pieces of wire to tie the belt onto myself. I simply looped each wire through opposite holes in the belt and twisted the ends together to fasten. It took me about 5 minutes to put on, and about a minute to cut off again. I similarly attached the bead strands to the base of the belt using pieces of gold wire.
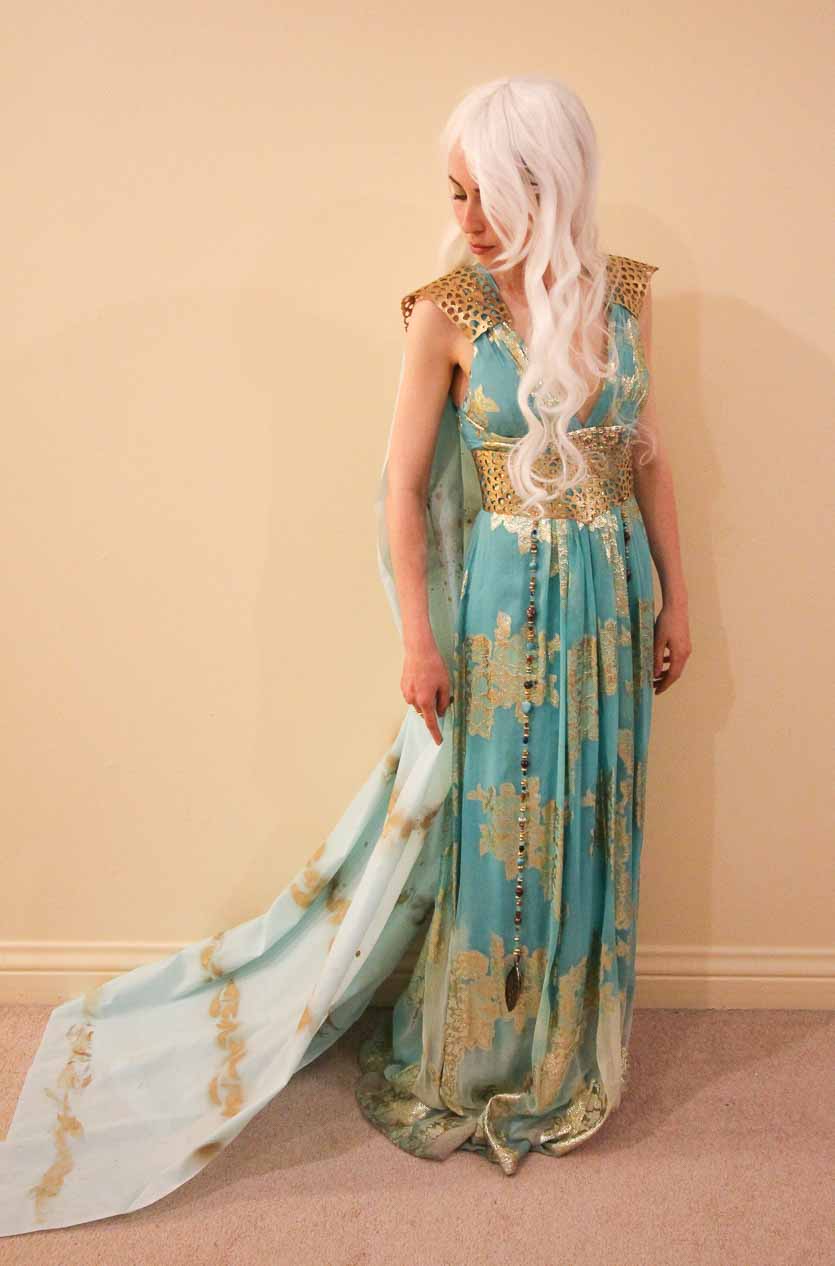 |
| Ta-Da! |
Interested in more Game of Thrones crafts?
- Make this DIY Iron Throne Centerpiece out of cocktail swords!
- Quick & easy favor boxes for Game of Thrones weddings or theme parties. Also makes a great place marker for Targaryen-themed dinner parties.
Looking for more costume ideas?
- Make this Yzma costume for under $50 and get your Emperor's New Groove on!
Concluding Thoughts
This was surprisingly easy, cheap and effective! The costume held up well over the timespan of a party. I should note that the glue becomes noticeably softer when heated to body temperature. If the belt is under a lot of tension, the heat of your body may cause it to deform, so try not to make the belt too tight! The shoulder pieces were well equipped to hold up the weight of a few yards of fabric, and even survived a few people stepping on my cape!
The response to my costume was overwhelmingly positive. I got a lot of people both in real-life and in my Imgur Album (which has gotten over 100,000 views - wow!) that I looked like Elsa from Frozen. I guess that's close enough. Maybe I can repurpose parts of this dress for a future Elsa costume!
And as an extra bonus? I found a wonderful new purpose for my DIY Iron Throne Centerpiece!


No comments:
Post a Comment